Skip to content
Dovetail & Dust

HUB 02 · Power Tools

How to Sand End Grain

End grain is thousands of open tubes pointing at you. It cuts slower, scratches deeper and drinks finish — which is why the method that works on a face leaves end grain looking burnt and blotchy.

By Stephen V.Updated How we research
#ad

We earn a commission when you buy through our Amazon links, at no extra cost to you. It never changes our rankings, and we say so when the cheaper tool is the better buy. How this works.

Sand end grain through the same grits as the face, then keep going one or two grits finer — and before the last pass, wipe it with a damp cloth, let it dry and sand again. That single extra step is the difference between end grain that takes finish evenly and end grain that goes dark, patchy and rough the first time anything wet touches it.

End grain is not a harder version of face grain, it is a different surface. On a face you are cutting along the sides of the wood fibres. On end grain you are cutting across the open ends of them, like sanding the end of a bundle of drinking straws. Abrasive cuts those tubes off rather than shearing them, the ends crush and tear rather than slicing cleanly, and every one of them stays open and ready to absorb whatever you put on next.

1. Flatten before you sand

Sandpaper is a terrible tool for removing a saw mark or levelling a joint on end grain. If the surface is not already flat — an end-grain cutting board after glue-up, a mitred corner that is proud, a leg bottom — take it down with something that cuts rather than abrades: a block plane with a sharp low-angle iron, a sanding block on a flat surface, or a drum sander. Chasing flatness with a random orbit sander hollows the soft early wood and leaves the hard late wood standing.

2. Start where the face started, not coarser

There is a strong temptation to start at 60 or 80 grit because end grain cuts so slowly. It is the wrong instinct. Coarse abrasive on end grain tears the fibre ends rather than cutting them, and those torn ends are exactly what shows up later as dark patches under stain. Start at the same grit you would use on the face — usually 120 — and accept that it takes longer.

3. Go two grits finer than you would on a face

On a face, 180 is plenty for most finishes. On end grain, keep going: 220 is a sensible minimum, and 320 is not excessive on a show surface like a cutting board or a mitred box corner. Each finer grit closes the open ends down a little further, and the closer they are the less finish they can drink.

That is also the reason end grain looks darker than the face under the same stain. It is not the colour of the wood, it is the quantity absorbed. Sanding finer is the main lever you have on it.

4. Keep the sander moving, and keep the pressure off

End grain generates heat fast, because the abrasive is cutting across fibre ends rather than slicing along them. Dwell in one place and you burnish the surface — polish it closed and glaze it — and a burnished patch rejects finish just as visibly as a torn one absorbs it.

The technique is the same discipline a face wants, applied harder: move about an inch a second, overlap half a pad, and let the weight of the tool be the only pressure. We go through it properly in how to use a random orbital sander, and the swirl-mark causes in why your sander leaves swirl marks.

5. Raise the grain, then sand it back

This is the step that gets skipped and the one that matters most. Wipe the end grain with a damp — not wet — cloth. The water swells the crushed fibre ends and they stand up. Let it dry completely, then sand lightly with your final grit to shear those raised ends off.

Do this and the surface stays smooth when the finish goes on. Skip it and the first coat of any water-based product raises exactly the same fibres, and you are sanding a half-finished surface instead of a bare one.

6. Seal before stain, if you are staining

End grain soaks up pigment and goes several shades darker than the face next to it. If you want the colour to match, the standard answer is a sealing coat first — a wash coat of thinned finish or a dedicated pre-stain conditioner — applied to the end grain only, so it absorbs less when the stain arrives.

On a cutting board or anything food-related, none of this applies: the finish is usually a penetrating oil and dark end grain is the look. Read tools needed to make a cutting board for that project end to end.

The tools that make this quick

End grain is a patience tax, and the right tool reduces it. A random orbit sander with variable speed does the flat work; an oscillating spindle sander does curves and inside corners that a pad cannot reach; a rasp takes material off fast when you have a lot to lose before any sanding starts.

The short answer

Quick picks

#ProductBest forScorePrice
01
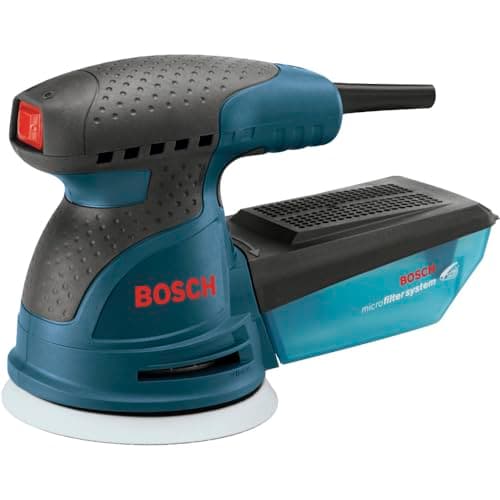
Bosch Bosch ROS20VSC 5-in Random Orbit Sander
Bosch ROS20VSC 5-in Random Orbit Sander

The one most shops should buy. Variable speed, a genuinely effective onboard dust canister and a low-vibration body, at a price that makes the premium sanders hard to argue for.

Best overall
8.4
$99.00Amazon
02
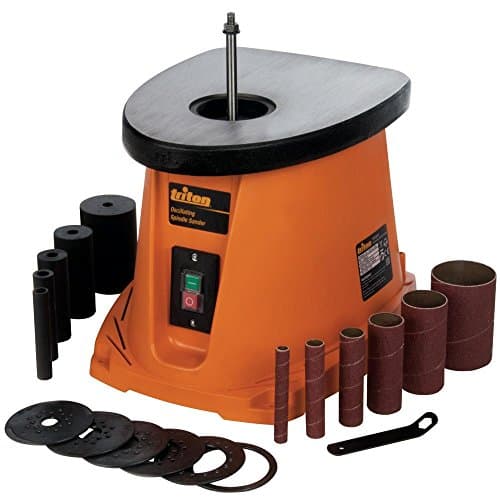
Triton Triton TSPS450 Cast-Iron Oscillating Spindle Sander
Triton TSPS450 Cast-Iron Oscillating Spindle Sander

A cast-iron top instead of stamped steel. It is heavier, flatter and quieter, and the difference shows on parts you actually care about.

Best table
8.2
$149.99Amazon
03
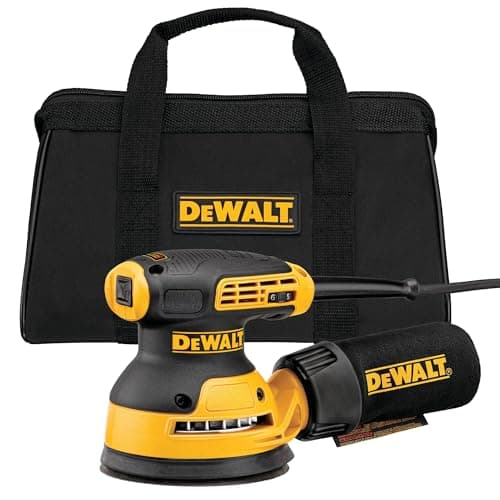
DeWalt DeWalt DWE6423 5-in Random-Orbit Sander
DeWalt DWE6423 5-in Random-Orbit Sander

The sander to start with. Variable speed, comfortable in the hand, and a hook-and-loop pad that takes cheap, common discs.

Best first sander
7.5
$79.00Amazon
04
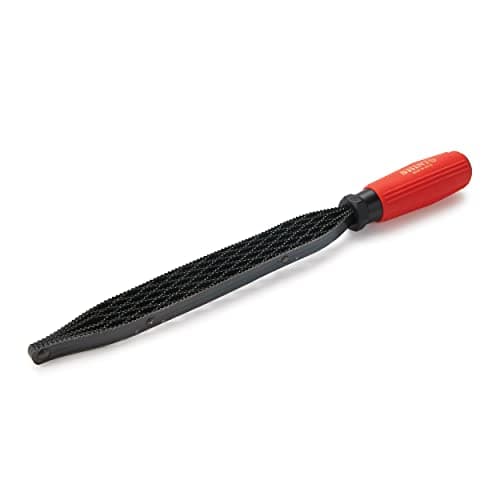
Shinto Shinto Saw Rasp (9 in)
Shinto Saw Rasp (9 in)

Ten hacksaw blades riveted into a crosshatch. It hogs wood at a rate no conventional rasp matches, and the fine side still leaves a workable surface.

Best overall
8.4
$20.98Amazon

#ad · Live prices from the Amazon Product API, as of October 17, 2026. Where we have no verified live price, we show none — we would rather leave a gap than print a number that has rotted.

In detail

The picks, in full

01
Bosch Bosch ROS20VSC 5-in Random Orbit Sander

Best overall

Bosch ROS20VSC 5-in Random Orbit Sander

5 in pad2.5 AVariable speedDust canister
8.4/10

The one most shops should buy. Variable speed, a genuinely effective onboard dust canister and a low-vibration body, at a price that makes the premium sanders hard to argue for.

Finish quality
8
Dust handling
8
Ergonomics
9
Build
8
Value
9

Pros

  • Variable speed lets you drop the pad speed for finish coats and edges
  • Microfilter canister actually keeps the shop air readable without a vac attached
  • Comfortable enough to hold through a long sanding session

Cons

  • Hook-and-loop pad wears out and is a consumable, like every sander here
  • Canister is a compromise — real extraction still needs a hose

Don't buy this if…

…you sand for hours daily. A brushless or pneumatic sander will outlast this on a production schedule.

$99.00View on Amazon

Price as of October 17, 2026. Prices change — Amazon's is the one that counts.

#ad · we may earn a commission from this link to Bosch ROS20VSC 5-in Random Orbit Sander

02
Triton Triton TSPS450 Cast-Iron Oscillating Spindle Sander

Best table

Triton TSPS450 Cast-Iron Oscillating Spindle Sander

3.5 A motorCast iron tableOscillating spindleOnboard spindle storage
8.2/10

A cast-iron top instead of stamped steel. It is heavier, flatter and quieter, and the difference shows on parts you actually care about.

Sanding quality
9
Table size
8
Dust collection
7
Build
9
Value
8

Pros

  • Cast iron top stays flat and damps vibration, so the edge you sand is the edge you wanted
  • Spindles and table inserts store on the machine rather than in a drawer you cannot find
  • Noticeably quieter under load than the sheet-metal machines

Cons

  • Heavier to lift on and off a bench between uses
  • Costs two to three times the budget option for the same basic function

Don't buy this if…

…the sander will be stored on a shelf between projects. You will resent the weight.

$149.99View on Amazon

Price as of October 17, 2026. Prices change — Amazon's is the one that counts.

#ad · we may earn a commission from this link to Triton TSPS450 Cast-Iron Oscillating Spindle Sander

03
DeWalt DeWalt DWE6423 5-in Random-Orbit Sander

Best first sander

DeWalt DWE6423 5-in Random-Orbit Sander

5 in pad8k–12k OPMVariable speedDust bag
7.5/10

The sander to start with. Variable speed, comfortable in the hand, and a hook-and-loop pad that takes cheap, common discs.

Finish
8
Ergonomics
8
Dust handling
6
Value
8

Pros

  • Smooth variable speed for finish work
  • Uses ubiquitous 5-inch 8-hole discs
  • Comfortable rubber overmold for long sessions

Cons

  • Onboard dust bag is minor — connect a vac for real collection
  • Corded, so you're tethered

Don't buy this if…

…you want cordless freedom and already own the batteries — a cordless model may suit a mobile setup better.

$79.00View on Amazon

Price as of October 17, 2026. Prices change — Amazon's is the one that counts.

#ad · we may earn a commission from this link to DeWalt DWE6423 5-in Random-Orbit Sander

04
Shinto Shinto Saw Rasp (9 in)

Best overall

Shinto Saw Rasp (9 in)

9 inSaw-blade constructionCoarse + fine facesWooden handle
8.4/10

Ten hacksaw blades riveted into a crosshatch. It hogs wood at a rate no conventional rasp matches, and the fine side still leaves a workable surface.

Cutting speed
10
Surface finish
7
Control
7
Durability
8
Value
10

Pros

  • Removes waste dramatically faster than a stitched rasp for the money
  • Two grades in one tool — flip it for the finer face
  • Open construction clears its own shavings instead of clogging

Cons

  • The aggressive face is easy to overshoot with — stay well off your line
  • Flat only, so it cannot get into a tight concave curve

Don't buy this if…

…your shaping is delicate and concave. A half-round cabinet rasp is the right shape for that.

$20.98View on Amazon

$24.5014% off

Price as of October 17, 2026. Prices change — Amazon's is the one that counts.

#ad · we may earn a commission from this link to Shinto Saw Rasp (9 in)

The four side by side

Published listing specifications for the four tools above, with the part of the job each one belongs to.

ToolWhat it is for herePublished specifications
Bosch ROS20VSCFlat end grain, all grits5 in. pad, 2.5 A, variable speed, dust canister
Triton TSPS450Curves, inside corners, chair parts3.5 A, cast-iron table, oscillating spindle, onboard spindle storage
DeWalt DWE6423First sander, budget route5 in. pad, 8,000–12,000 OPM, variable speed, dust bag
Shinto saw raspFast stock removal before sanding9 in., saw-blade construction, coarse and fine faces

Why an oscillating spindle sander belongs on this list

End grain shows up on every curve you cut — the inside of an arch, a chair seat cut-out, a template-routed corner — and those are exactly the surfaces a flat pad cannot touch. A spindle sander presents a moving drum to the work and oscillates it up and down at the same time, which means no single abrasive grain stays in one track. That is the same reason a random orbit pad does not leave arcs: a path that never repeats cannot cut a groove.

If you make boxes, curved aprons or anything template-routed, it is the single biggest upgrade available for end-grain work. Our best spindle sander roundup ranks the family, including the belt-and-spindle combination machines.

Hand-sanding end grain: use a block, always

Paper held in the fingers follows every soft ring and rounds the edges of the workpiece. A hard block — cork, a scrap of MDF, a rubber sanding block — keeps the abrasive flat and keeps the arris crisp. On a mitred box corner or a dovetail end grain surface, that is the whole difference between a sharp-looking joint and a soft one.

Sand in one direction across the end grain rather than in circles where you can; circles cut across fibre ends from every angle at once and leave a surface that scatters light differently from the face beside it.

The dust point, which is not optional here

End grain produces very fine dust, more of it than face sanding, because you are pulverising fibre ends rather than shaving them. Hardwood dust is a recognised respiratory hazard, which is why a sander on an extractor beats a sander on its own bag by a wide margin. Our wood dust health risks page covers what the exposure actually is, and best shop vac for woodworking covers what to hook the sander to.

Where these numbers come from

The pad sizes, amperages, OPM ranges and rasp dimensions above are the manufacturers' own published listing specifications, cited per product in Sources. The technique on this page is standard shop practice rather than a tested claim; we have not measured surface roughness or finish absorption in a lab, and our methodology page says so plainly. Prices come from the live price feed and carry the date they were pulled.
How we picked

We do not run a testing lab

We researched published manufacturer specifications, manuals and spec sheets, ran the arithmetic those specs support, and read owner reviews at volume, then scored each tool against a published rubric. The scores are judgments from documented research — they are not measurements we took, because we do not have a lab and we are not going to pretend we do. Where a number came from a manufacturer's document, we name it and link it in Sources.

Questions

Frequently asked

What grit should I sand end grain to?
One or two grits finer than the face: 220 as a minimum, 320 on a show surface like a cutting board or a mitred corner. Finer grits close the open fibre ends down, which is what stops end grain drinking finish and going dark.
Why does end grain look blotchy after staining?
Because it absorbs far more pigment than the face beside it, and because torn fibre ends from coarse abrasive absorb unevenly. Sand finer than you would a face, raise and sand back the grain with a damp cloth, and seal the end grain with a wash coat or conditioner before the stain.
Can you sand end grain with a random orbital sander?
Yes, and it is the right tool for flat end grain. Keep it moving, keep the pressure to the weight of the tool, and do not try to flatten with it — a sander chasing flatness on end grain hollows the soft early wood and leaves the hard rings standing.
Should I wet end grain before sanding?
Before the final pass, yes. A damp wipe swells the crushed fibre ends so they stand up; once it is fully dry, a light pass with your finest grit shears them off. Done then, the surface stays smooth when the finish goes on instead of roughening under the first coat.
Why does my end grain burn when I sand it?
Heat from dwelling in one spot, worn abrasive, or both. End grain cuts slowly, so people push harder and stay longer, which polishes the surface closed rather than cutting it. Change the disc more often than feels necessary and keep the sander moving.

Keep reading

Receipts

Sources

We do not run a testing lab, and we do not pretend to. Our picks come from published manufacturer specifications and manuals, the arithmetic those specs support, and owner reviews read at volume. Where we could not verify something, we say so on the page rather than quietly leaving it out. Read our full method.